REINFORCEMENT LEARNING
Pong
Pong is the first computer game I ever played back in the 70s, and therefore I like the idea of teaching it to a computer. It feels like returning the favor.
Besides, the great Andrej Karpathy has written a wonderfully clear post on training machines to play Pong using the conceptually simple Policy Gradients technique. You can find the post here - http://karpathy.github.io/2016/05/31/rl/
So Pong it is.
Prepare a Game for RL
When I program a new game in Jupylet I enjoy doing it interactively in a
Jupyter notebook while the game is running. This is how the Jupylet example
notebooks were created. However, to programmatically control a game in RL we
need it in the form of a Python module, and we need to define the step(),
observe(), and reset() functions.
To convert a Jupylet game into a Python module, simply select Download as Python from the Jupyter notebook File menu.
Alternatively you can select and copy all the notebook cells with Ctrl+A and Ctrl+C and then paste everything into a text editor. However, in this case you will need to manually comment out any markup text.
Let’s try that with the Pong example notebook examples/21-pong.ipynb. That notebook implements a two player version of Pong. Run it to see what it does and then convert it to a Python module by the name 21-pong.py and save it in the examples/ folder.
If you did it correctly you should be able to run the game from a Miniconda prompt with:
python examples/21-pong.py
Technically speaking 21-pong.py is a Python script, not a module. A Python module is a collection of functions and data structures that is meant to be imported, not run; a library that other modules or scripts may import for its functionality. It should not start a game of its own accord.
However, in Python the distinction between scripts and modules is a bit blurry and scripts often double as modules and vice versa.
It’s actually nice to be able to run the Pong game from the command line, so let’s keep that functionality and modify 21-pong.py to double as a python module.
To do that open the file in a text editor and replace the
app.run() call at the end of the file with:
if __name__ == '__main__':
    app.run()
This is a very common programming pattern in Python. The magical __name__ variable will only equal ‘__main__’ if 21-pong.py is run as a Python script (e.g. as we did above).
Next we need to fix the module’s filename. While you can name a Python script anything you want, Python module names follow the same restrictions as Python variable names and cannot contain dashes; therefore, a filename like pong.py would be much better.
However, don’t rename the file just yet since we have already done that for
you, and we have also added example definitions for the step(),
observe(), and reset() functions.
You can find the final version of the Pong game in its module form at examples/pong.py.
The step(), observe(), and reset() functions are not strictly
required, rather they are recommended as a pattern supported by the Jupylet
API, and as a programmer you are free to define their inputs and outputs in
any way you wish.
The step() function should be called with an action and should
return the next observation and reward from the game environment; the
observe() function should return an observation of the environment; and
the reset() function should be called to reset the game state to a
predefined state (e.g. the beginning of the game).
Let’s take a look at how these three functions are defined for our Pong game:
def step(player0=[0, 0], player1=[0, 0], n=1):

    # Convert the first player's action to pressing the A or D keys.
    state.key_a, state.key_d = player0

    # Convert the second player's action to pressing the left or right key.
    state.left, state.right = player1

    # Take a snapshot of the scoreboard before the step.
    score0 = state.score0
    score1 = state.score1

    app.step(n)

    # Compute reward from change in scoreboard.
    reward = (state.score0 - score0) - (state.score1 - score1)

    return observe(reward)


def observe(reward=0):

    return {
        'screen0': app.observe(),
        'player0': {'score': state.score0, 'reward': reward},
        'player1': {'score': state.score1, 'reward': -reward},
    }


def reset():
    load('pong-start.state')
    return observe()
The particular reset() function defined above relies on
load() and save() functions. This is how they are defined in
the pong module:
def load(path):
    app.load_state(path, state, ball, padl, padr, scorel, scorer)
    return observe()


def save(path=None):
    app.save_state('pong', path, state, ball, padl, padr, scorel, scorer)
The arguments to the app.load_state()
and app.save_state() functions,
namely state, ball, padl, padr, scorel, scorer are the global
game objects that uniquely determine the game state. In general you can
include any object that implements the get_state() and set_state()
methods.
Control a Game Instance
The code to control our little game of Pong is in the examples/22-pong-RL.ipynb notebook. Let’s see how it’s done.
Note
The two functions show_image() and show_images() used here to show
numpy arrays as bitmap images are defined in the notebook.
Creating a game instance is as easy as this:
import jupylet.rl

pong = jupylet.rl.GameProcess('pong')
Next, to start the game in a new child process, run:
game.start()
Once the game has started you can observe the game environment. You can
program the pong module to return anything you want in response to
the observe() call. In the case of our example Pong it returns a
dictionary such as the following:
In []: pong.observe()
Out[]: {'screen0': array([[[124, 113, 218, 255],
                [124, 113, 218, 255],
                [124, 113, 218, 255],
                ...,
                [124, 113, 218, 255],
                [124, 113, 218, 255],
                [124, 113, 218, 255]],

                ...,

                [[124, 113, 218, 255],
                [124, 113, 218, 255],
                [124, 113, 218, 255],
                ...,
                [124, 113, 218, 255],
                [124, 113, 218, 255],
                [124, 113, 218, 255]]], dtype=uint8),
        'player0': {'score': 0, 'reward': 0},
        'player1': {'score': 0, 'reward': 0}}
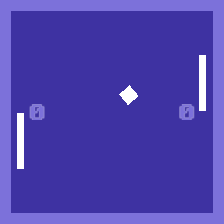
The ‘screen0’ entry is a numpy array that contains a bitmap image of the game video at time t0 represented as a 3 dimentional array. Let’s show it as an image:
o = pong.observe()
show_image(o['screen0'])

Now, let’s play a few steps; both players choose the action to move their game paddles rightward for 5 consecutive steps:
o = pong.step(player0=[0, 1], player1=[0, 1], n=5)
show_image(o['screen0'])
If you wanted them to move leftward you would use [1, 0] instead of [0, 1]. Finally, let’s reset the game and start over:
pong.reset()
That’s all there is to it.
Control Multiple Games
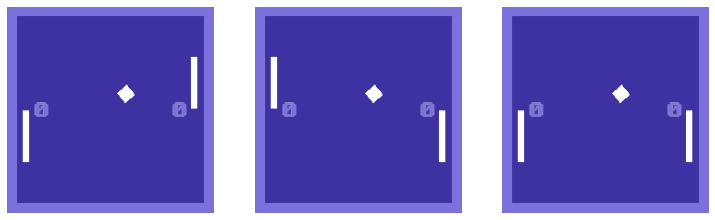
It’s all fine and dandy to control a game of Pong programmatically but we could just as easily control multiple games simultaneously.
Here is how you would create 3 simultaneous games:
games = jupylet.rl.Games(['pong', 'pong', 'pong'])
games.start()
You can create more games with a longer list or mix different games in the same list if you wish to.
Let’s observe them:
ol = games.observe()
show_images(o['screen0'] for o in ol)

And step through five consecutive steps:
ol = games.step([[0, 1], [1, 0], [0, 1]], [[0, 1], [1, 0], [1, 0]], n=5)
show_images(o['screen0'] for o in ol)
For each of the players we supply an action for each of the simultaneous games. So [[0, 1], [1, 0], [0, 1]] means paddle to the right in the first game, to left in the second, and to the right in the third ongoing game.
Finally let’s reset them to their initial state:
games.reset()
By running multiple simultaneous games a single Linux machine with a GPU you can easily reach 4000 Pong frames per second.
Jupylet in the Cloud
To train any non trivial deep learning agent you need a machine that can compute trillions of multiplications and additions per second. Traditionally this simply means a machine with an Nvidia GPU.
If you have such a machine at home you can skip this section. If not, this section explains how to setup and run Jupylet on a remote Amazon EC2 instance with a GPU.
Jupylet was tested on Amazon EC2 GPU servers running Ubuntu 18.04. If you haven’t already setup an EC2 instance I recommend that you instantiate it from the AWS Deep Learning AMI (Ubuntu 18.04) since it includes the required Nvidia drivers, CUDA, cuDNN, and conda.
To connect to your EC2 server you will need an SSH client. On Windows machines you won’t find anything better than the awesome PuTTY.
On a remote EC2 instance Jupylet runs in so called headless mode. This means it uses the Nvidia GPU to render game frames without creating a game window. To make this possible you will need to install a few packages by running the following commands in an SSH terminal on the remote instance:
sudo apt-get update -y
sudo apt-get install -y mesa-utils libegl1-mesa xvfb freeglut3-dev
Next, create a new conda environment, activate it, and install Jupylet:
conda create -y -n jpl python=3.10 pip
conda activate jpl

pip install jupylet
Next, download the jupylet repository so you may run its example notebooks:
sudo apt-get install -y git

git clone https://github.com/nir/jupylet.git
Now each time you would like to start a Jupyter notebook server on the remote instance, open an SSH terminal and type the following:
screen
conda activate jpl
cd jupylet/examples
jupyter notebook --no-browser --ip=*
Note
The screen program will prevent the Jupyter server from exiting if the
SSH terminal accidentally disconnects. If it does disconnect you may
reconnect to the running screen session with the screen -dr command.
The jupyter notebook command above should produce some output including a
security token in the form of a long string of hex digits. Copy that token
since you will soon need it.
Finally, open a new tab in your browser and navigate to port 8888 of the public DNS address of your EC2 instance. It should look something like http://ec2-BLAH.BLAH.BLAH.compute.amazonaws.com:8888/
If you did everything correctly you will be prompted to enter the security token that you copied above. Paste it in and you are done.
Note
Jupyter notebook sessions use regular unsecure HTTP connections. If you wish you can setup the Jupyter server to use HTTPS or limit the EC2 firewall to only allow connections from your IP address.